Setting Up a WSL Development Environment
A straightforward guide to using WSL. This post won’t cover what WSL is or how to install it — it simply shares how I use WSL for day-to-day development.
My current WSL configuration is as follows:
1 | NAME STATE VERSION |
I rely heavily on CLI tools to boost my productivity and improve my overall experience, so a great terminal and a set of efficient CLI tools are essential for me.
WSL Configuration
For file permission issues, refer to [Long-term Updates] WSL Usage Notes.
Configure git so that you don’t have to repeatedly enter your username and password when cloning repositories over HTTPS:
1 | git config --global credential.helper store |
The default git editor in WSL doesn’t suit me well — I prefer vim. You can change the default editor with the following command:
1 | git config --global core.editor vim |
CLI Tools
Terminal
On Windows, I recommend using Windows Terminal (download link). Reasons:
- Officially developed and maintained by Microsoft.
- Highly customizable to fit your workflow.
- Seamlessly switch between WSL, PowerShell, CMD, and Azure Cloud Shell.
Zsh
Ubuntu ships with Bash by default, which isn’t ideal for interactive daily use. Compared to Bash, Zsh is much better suited for interactive work, offering features such as:
- Directory navigation without
cd— in Bash you’d typecd projects, but in Zsh just typingprojectsis enough. - Path expansion — for example, typing
/u/locand pressing Tab expands it to/usr/local/. - Plugin and theme support.
How to install Zsh:
1 | sudo apt-get install zsh -y |
To learn more about Zsh, read the official documentation.
Oh My Zsh
Oh My Zsh is an open-source framework for managing your Zsh configuration. There’s a great line in its GitHub README: Oh My Zsh will not make you a 10x developer…but you may feel like one.
How to install Oh My Zsh:
1 | sudo apt-get install wget -y |
I use the default Oh My Zsh theme. If you want to change the theme, refer to the Readme.
Oh My Zsh Plugins
Plugins are a highlight — they can significantly boost productivity.
autojump is a small utility that lets you quickly navigate to any directory using fuzzy matching. For example, if I remember a directory name contains hexo and I’ve visited it before, I can just run j hexo to jump to it. Highly recommended.
Installation:
1 | sudo apt-get install autojump -y |
After installing, edit ~/.zshrc:
1 | plugins=(git autojump) |
The git plugin is included by default in Oh My Zsh and provides many shorthand aliases. For instance, I frequently use gst, which is an alias for git status. For more aliases, see ohmyzsh/plugins/git.
Oh My Zsh supports many more plugins — see Plugins for the full list.
Homebrew
Homebrew is a package manager. It also provides many useful CLI tools. I use Homebrew in WSL primarily for consistency — my work machine is a MacBook, so using the same tool across both environments gives me a uniform experience. Homebrew also makes installing its own CLI tools easier compared to apt.
Installation:
1 | /bin/bash -c "$(curl -fsSL https://raw.githubusercontent.com/Homebrew/install/HEAD/install.sh)" |
For more usage details, see The Missing Package Manager for macOS (or Linux) — Homebrew.
tig
When working with git, viewing commit history locally or finding a starting point for a reset using git log can be painful. tig solves this problem elegantly — it also lets you quickly browse the contents of each commit.
Installation:
1 | sudo apt-get install tig -y |
Language Runtime Version Management
The following are version management tools I’ve personally used. For other languages, explore on your own.
| Language | Tool | Installation | Documentation |
|---|---|---|---|
| Java | jenv | brew install jenv | jenv/jenv: Manage your Java environment |
| Node.js | nvm | wget -qO- https://raw.githubusercontent.com/nvm-sh/nvm/v0.39.1/install.sh | bash | nvm-sh/nvm: Node Version Manager - POSIX-compliant bash script to manage multiple active node.js versions |
| Ruby | rbenv | brew install rbenv | rbenv/rbenv: Manage your app’s Ruby environment |
| Python | pyenv | brew install pyenv | Simple Python version management (from pyenv) |
Integration with JetBrains IDEs
Two things are needed to integrate WSL with JetBrains IDEs.
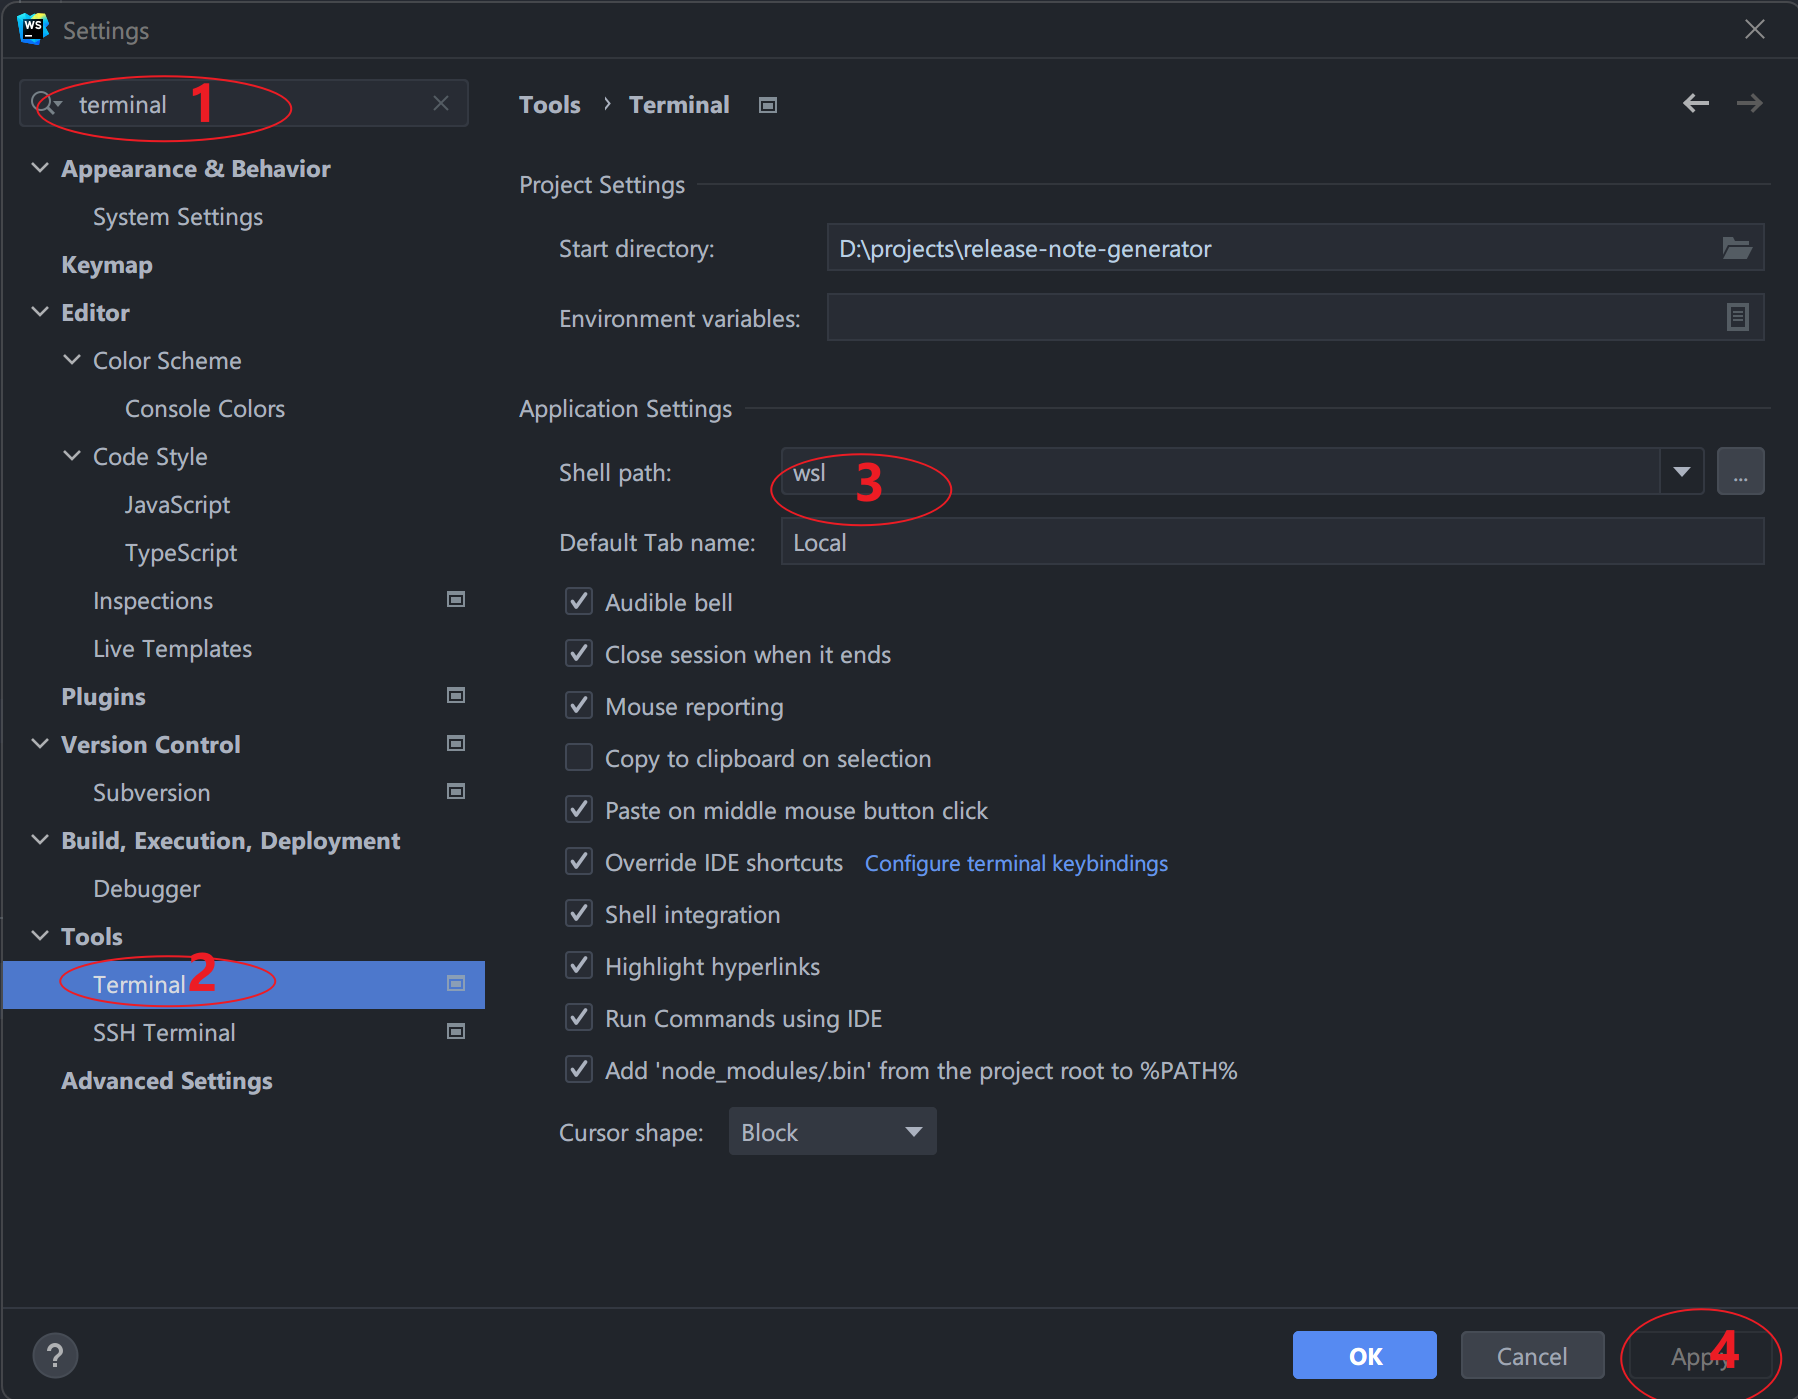
- Switch the terminal — the default is CMD. For a better experience, switch it to WSL.
Go to Settings → Tools → Terminal, and under Application Settings change the Shell path to wsl.
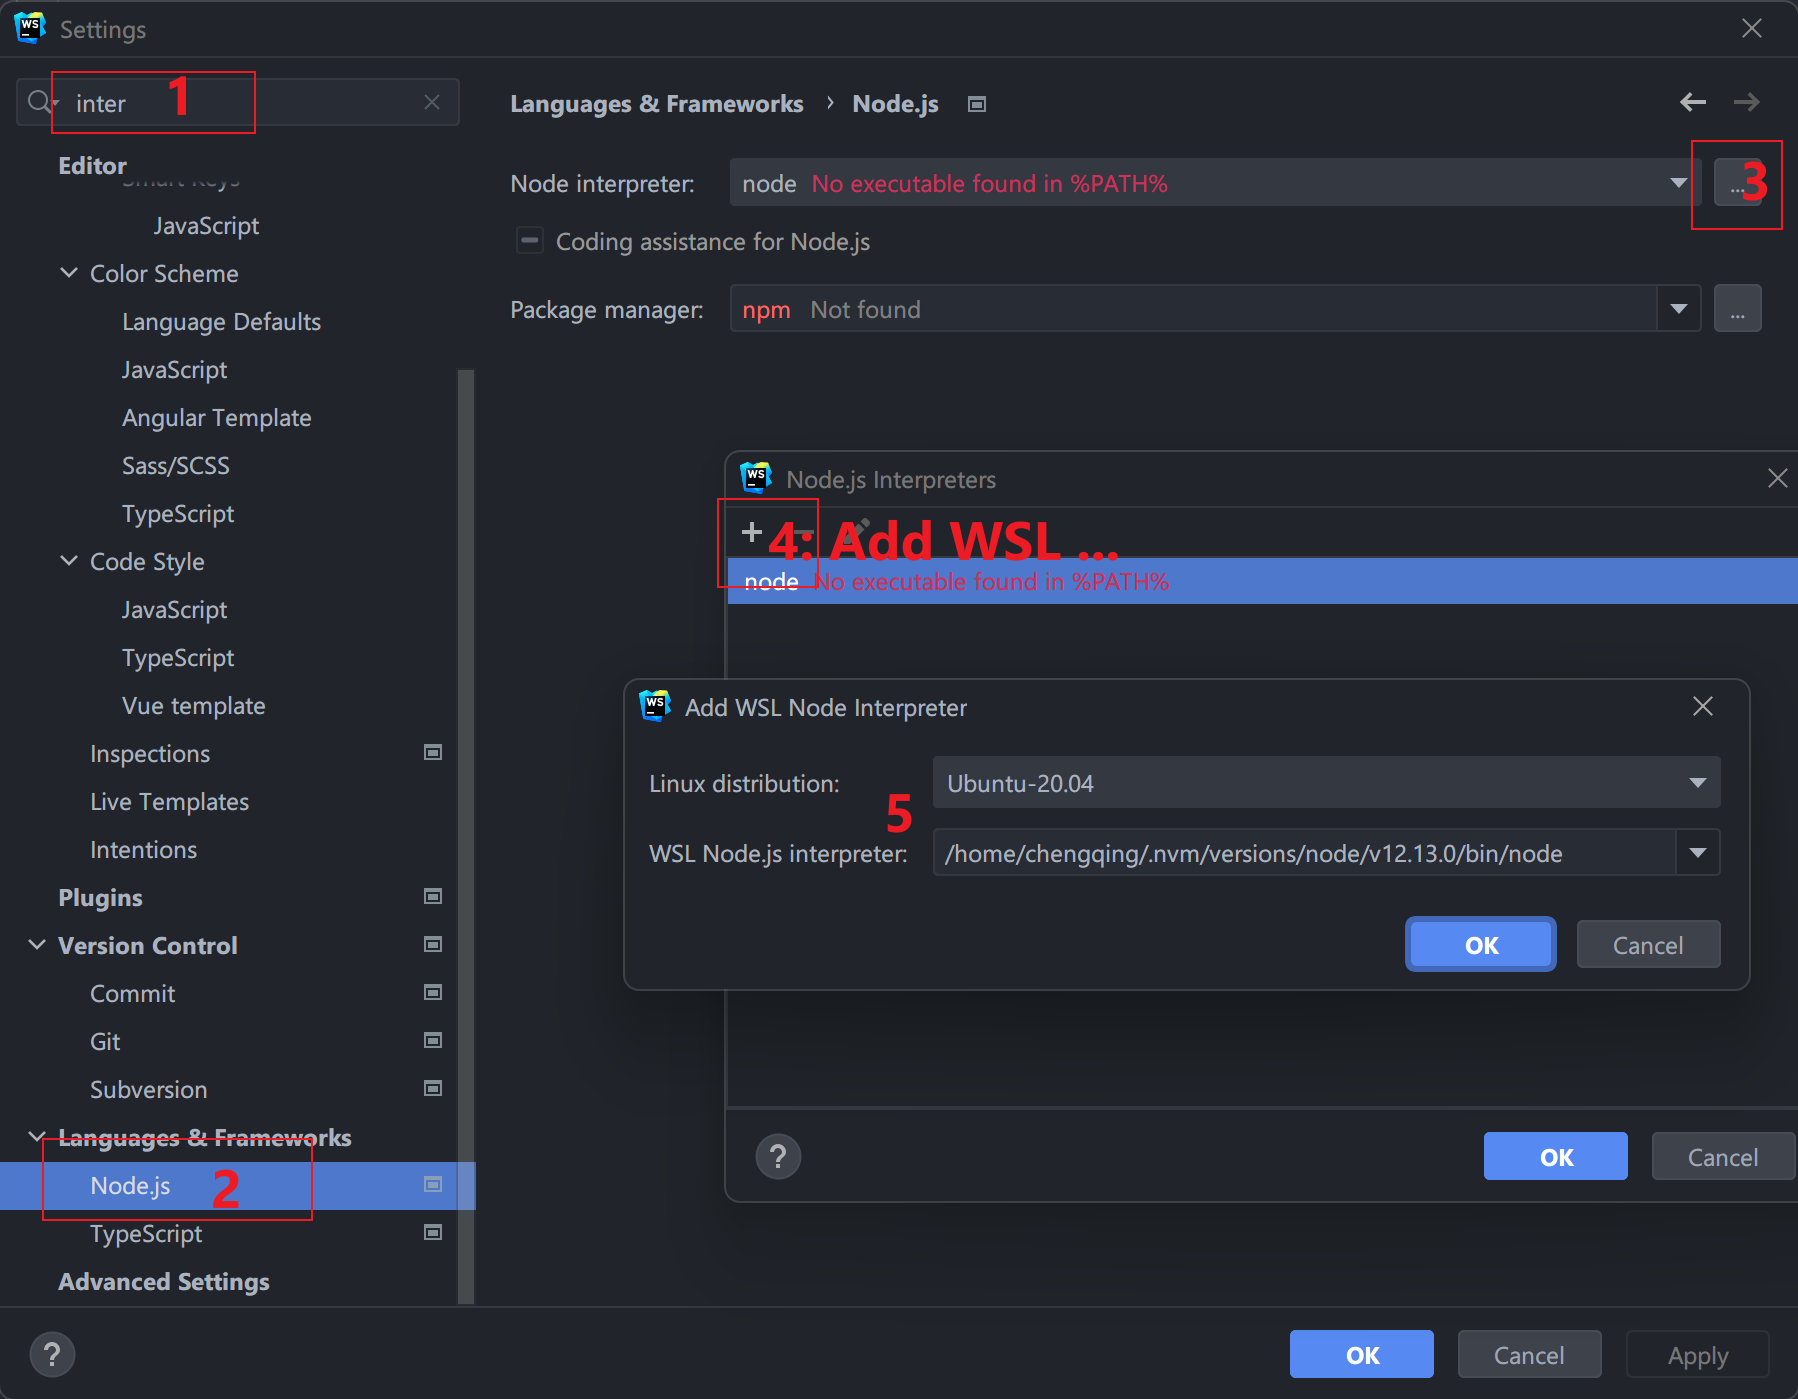
- Configure the SDK — using WebStorm as an example.
VS Code
- Install the
Remote Developmentextension in VS Code. - Press
Ctrl + Shift + P, typeshell command, and runInstall 'code' command in PATH command. - You can now use VS Code from within WSL — for example, run
code .to open the current directory in VS Code.